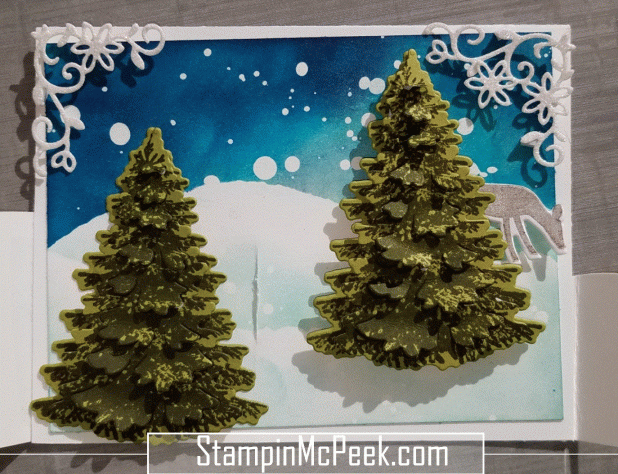
Who doesn’t love this time of year! There is a slight chill in the air (only because we cranked the air down – I live in FL); holiday movies are on the TV (much to the objection of my family) and Christmas cards are in full production! How much better can things get? I hope you enjoy the cards everyone made for the Christmas Blog Hop.

To create the background I used whisper white cardstock and liquid resist. I splattered the resist on the paper in random dots.
To create the snow banks I tore pieces of paper in valley shapes and sponged the sky around it.
Just keep working with the blues until you get an image you like. After the ink dries you simply rub off the resist with your finger. Easy as pie!
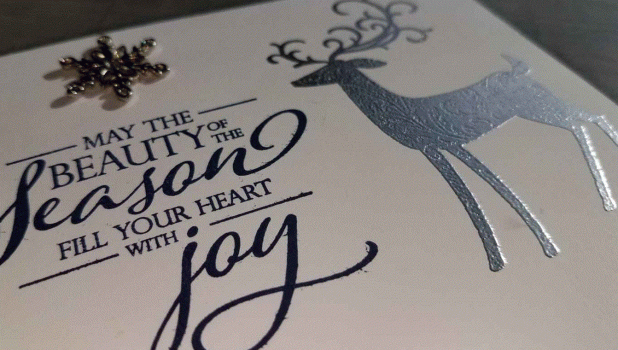
I stamped each tree twice and made each tree 2 layers thick only “fluffing” the top layer. Here are some close up images of the card.


I used glimmer white paper to create the front wrapped snow back. Start with a piece 5.5 X 4.25 and cut it at 2.5″ to get the 2 different size “banks”. Cut the wave at the top of each piece.
These images show how to cut the “insert tab” to create the bend in the bank. They also show how the card closes to fit in an envelope.
Wrap the first flap and decide where you want the fist tab to be placed. This is where you will cut the first “slit”. Bend the next flap and decide where the 2nd flap should fall and cut the slit in the first snowbank.

No worries the front doesn’t have a statement that is on the back.


Please take time and check out all the other AMAZING cards our team designed. Be sure to leave a comment on each site to be registered to win the Lots of Happiness Card Kit.
1. Tami White
3. Tina Wardell
4. Pam Nichols
5. Lori Mueller
6. Rachael Rife
7. Julie DeGuia
10. Rachel Nichols
11. Kim McPeek You are here
12. Gianna Melone
13. Linda Cullen
Product List


Wow!! A fabulous card!
LikeLiked by 1 person
WOW! #stampitcontest
LikeLiked by 2 people
#stampitcontest
LikeLiked by 1 person
I love scene cards. #stampitcontest
LikeLiked by 1 person
Love the 3-d look!
#stampitcontest
LikeLiked by 1 person
Great card. Love the deer and the Bendi card!
LikeLiked by 1 person
#stampitcontest
Love you 3D card. TFS
LikeLiked by 1 person
Beautiful! Fabulous! Outstanding!
#stampitcontest
LikeLiked by 1 person
#stampitcontest
Very nice!
LikeLiked by 1 person
What a fun beautiful card! Cute deer and the rolled hills are just fun! Wonderful card Kim! #stampitcontest
LikeLiked by 1 person
Love your card! #stampitcontest
LikeLiked by 1 person
what a super fun card!! I’ve always wanted to learn this and thank you so much for sharing ❤
LikeLiked by 1 person
Thank you so much Tina – I hope rue image and write up are enough for you to do one. You always teach me so I am glad to return the favor:)
LikeLiked by 1 person
Love the rolled hills with deer! #stampitcontest
LikeLiked by 1 person
#stampitcontest
Outstanding Wow card! The snow is wonderful.
LikeLiked by 1 person
#stampitcontest
Wow! Like this style card and those trees are gorgeous!
LikeLiked by 1 person
#stampitcontest
AMAZING!!!!!! thanks for all the tips on how you made it!
LikeLiked by 1 person
I especially like your trees! What a great way to give them dimension!! So pretty! #stampitcontest
LikeLiked by 1 person
The three-D “snow”layers make this card pop! #stampitcontest
LikeLiked by 1 person
Love the 3-D effect #stampitcontest
LikeLiked by 1 person
#stampitcontest
LikeLike
Beautiful card, Kim!! Love all the texture and layers to create this scenery!! Thank you for sharing!
LikeLiked by 1 person
#Stampitcontest
LikeLiked by 1 person
You can’t go wrong with deer and snowbanks. You did a great job at creating a winter scene. tyfs #stampitcontest
LikeLiked by 1 person
#stampitcontest
BEAUTIFUL BACKGROUND! Love this card!
LikeLiked by 1 person
Pretty… #stampitcontest
LikeLiked by 1 person
#stampitcontest Very pretty!
LikeLiked by 1 person
#stampitcontest
LikeLiked by 1 person
#stampitcontest Amazing design. Love it.
LikeLiked by 1 person
#stampit contest
Nice card. Thanks for the inspiration.
LikeLiked by 1 person
#stampitcontest
LikeLiked by 1 person
#stampitcontest Wow!!!! …. just WOW!!!!
LikeLiked by 1 person
#stampitcontest Wow
LikeLiked by 1 person
great card #stampitcontest
LikeLiked by 1 person
The bended front is totally new to me and a great technique for depth
#stampitcontest
LikeLiked by 1 person
Thanks for the tips & close ups! Great card!
#stampitcontest
LikeLiked by 1 person
#stampitcontest
LikeLiked by 1 person
Wow! This is a lovely stamped scene and card!
#stampitcontest
LikeLiked by 1 person
Neat design for your layout—sweet card
#stampitcontest
LikeLiked by 1 person
Amazing card. So much dimension. #stampitcontest
LikeLiked by 1 person
#stampitcontest Nice 3D card!
LikeLiked by 1 person
Very cool!
#stampitcontest
LikeLiked by 1 person
#stampitcontest Wow – this is gorgeous! Love the texture and added details!
LikeLiked by 1 person
Very pretty! #stampitcontest
LikeLiked by 1 person
#stampitcontest Beautiful
LikeLiked by 1 person
Very Nice! #stampitcontest
LikeLiked by 1 person
#stampitcontest
WOW 😮
LikeLiked by 1 person
I love this technique but I haven’t got it yet . Love you scene too! Thanks #stampitcontest
LikeLiked by 1 person
Love this card. Thank you!
LikeLiked by 1 person
Love it
LikeLike
#stampitcontest how clever….3-D…this would make a great masculine card for any occasion.
LikeLike